Learn how to set up Amazon CloudFront with WordPress for serving your static images and important website’s files (.html .css, .js) from CDN servers like cdn.yourdomain.com or xyz.cloudfront.net.
WordPress is a technological marvel in the number of internet sites. Nowadays thousands of websites built-in WordPress because it’s free, open-source and it has a large community, but when it comes to speed optimization you need a CDN (Content Delivery Network) to deliver your statistics file from the geographically closest location.
However, officially WordPress has own CDN that is Photon CDN which is powered by JetPack plugin. You have to download and install the Jetpack plugin to use Photon CDN.
But, most WordPress developers do not prefer installing Jetpack because it is too heavy, maybe it can impact on your web hosting. Also, you can’t serve static files like CSS, JS, etc. It only supports images.
So, in this article, we are going to learn how to setup amazon CloudFront CDN with a WordPress website.
What is the Content Delivery Network (CDN)?
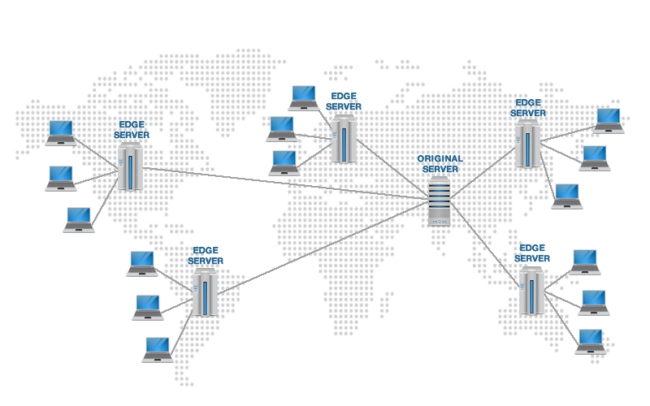
CDN (Content Delivery Network) is a geographically distributed network of proxy servers. Suppose if your website is hosted on London and a user from India wants to access your website, So the request goes India to London and then the server sent the requested file from London to India this time-consuming.
Here a CDN helps to get the requested file that will be served from the user’s geographically nearest location (Example: India, Singapore) instead of coming from London.
What is Amazon CloudFront?
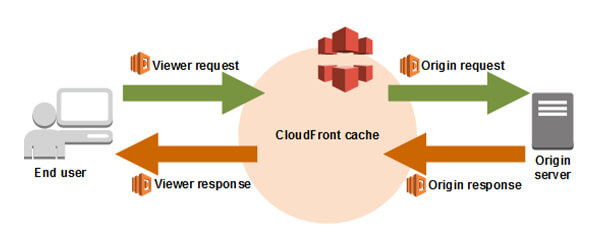
Amazon CloudFront is a content delivery network that is powered by Amazon Web Service, which speeds up the distribution of your static and dynamic web files such as .html, .css, .js, and image files, to your users.
CloudFront delivers your web content through globally distributed data centers called edge locations. When a user request file from the server CloudFront serves that files from his closest edge servers that provide the lowest latency (time delay), so that content is delivered very quickly with the best possible performance.
How to Set Up Amazon CloudFront With WordPress?
Set up a WordPress website with AWS CloudFront, not an easy task. You have to create an Amazon S3 bucket or a Load Balancer to deploy a CloudFront distribution. Also if you want to use CNAME like cdn.yourdomain.com you have to assign an SSL certificate with your distribution.
But, in this article, we learn how to set up Amazon CloudFront with WordPress through a plugin. So, let’s follow my steps to configure CloudFront with WordPress.
Steps to Set Up Amazon CloudFront With WordPress
Remember: Amazon CloudFront is a paid CDN service, but Amazon Web Service provides 1-year free trial for there products. You can try their products by joining the free trial.
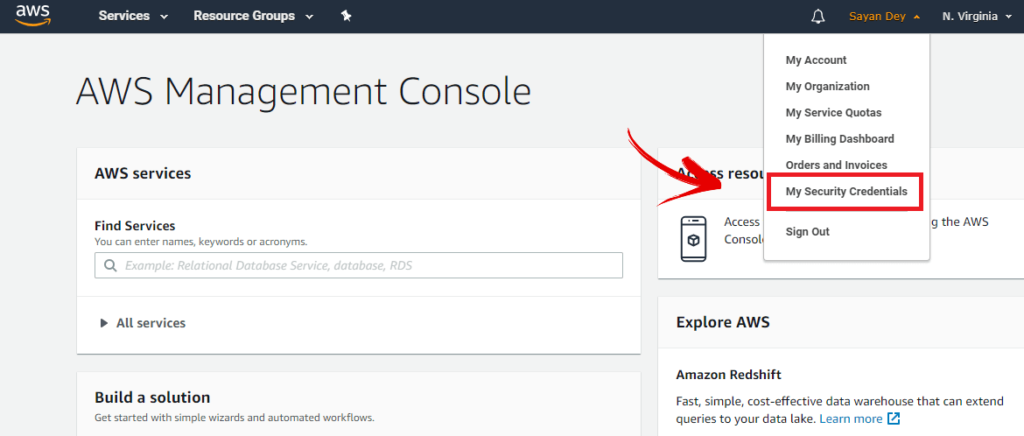
Step 1: Create an IAM User in Your AWS Console
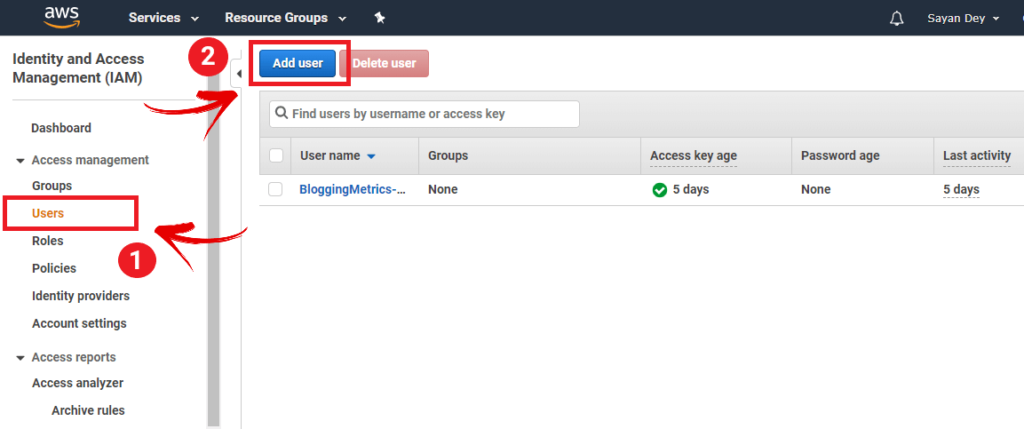
Create an IAM user for your AWS console is so easy, just log in your AWS console and go to “My Security Credentials“
After select, My Security Credentials on AWS console you have to create an IAM user to set up Amazon CloudFront with a WordPress website. To create a user select “User” from the left-hand side then click on the “Add user” button.
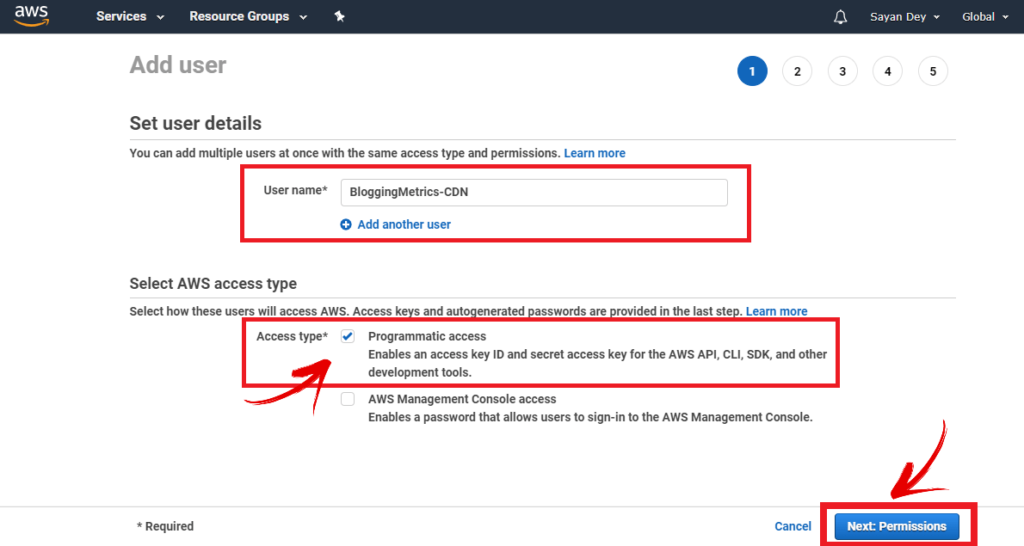
Now you have 5 steps to create an IAM user account that you can see on the top right corner of your computer screen that is:
- Details
- Permissions
- Tag
- Reviews
- Complete
Now right your username in the “User name*” field and Select the AWS access type* to Programmatic access (Enables an access key ID and secret access key for the AWS API, CLI, SDK, and other development tools) and click next.
Now you will be redirected to the Permission tab. Here you can see the “Set permission” section, make sure it select on “Attach existing policies directly” now copy this keyword “AWSCertificateManagerFullAccess CloudFrontFull” and search. Now two existing policies appear on your screen that is:
- AWSCertificateManagerFullAccess
- CloudFrontFullAccess
Now select both of these two policies and click Next to select Tag for your IAM user account.
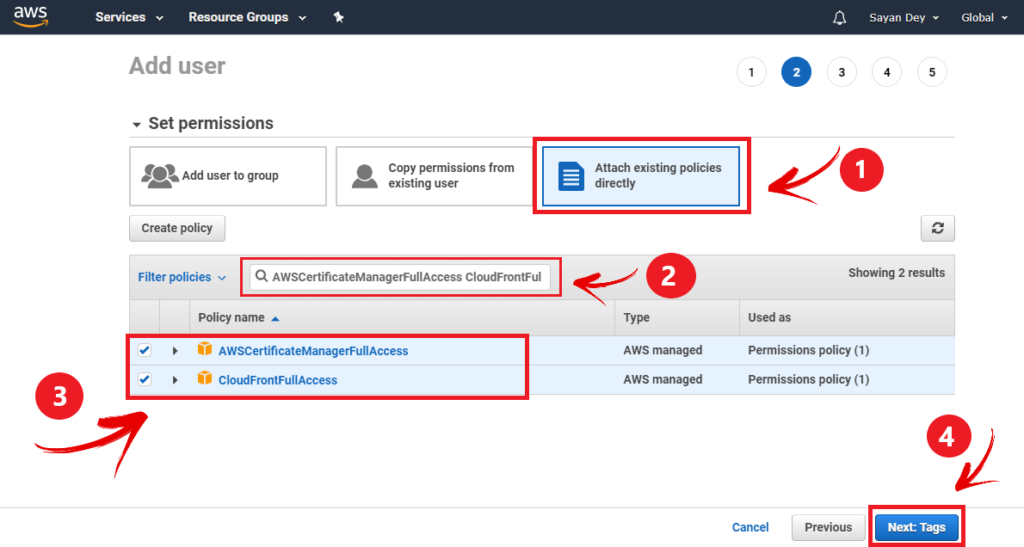
*Note: If you want to use CNAME for your CDN URL like cdn.bloggingmetrics.com, it mandatory to select this “AWSCertificateManagerFullAccess” policy. Or if you don’t need CNAME you can uncheck this policy [Recomended: Check this policy]
You will be redirected to the Tag page, no need to do anything on this page, just leave it and click on Next to go Review page.
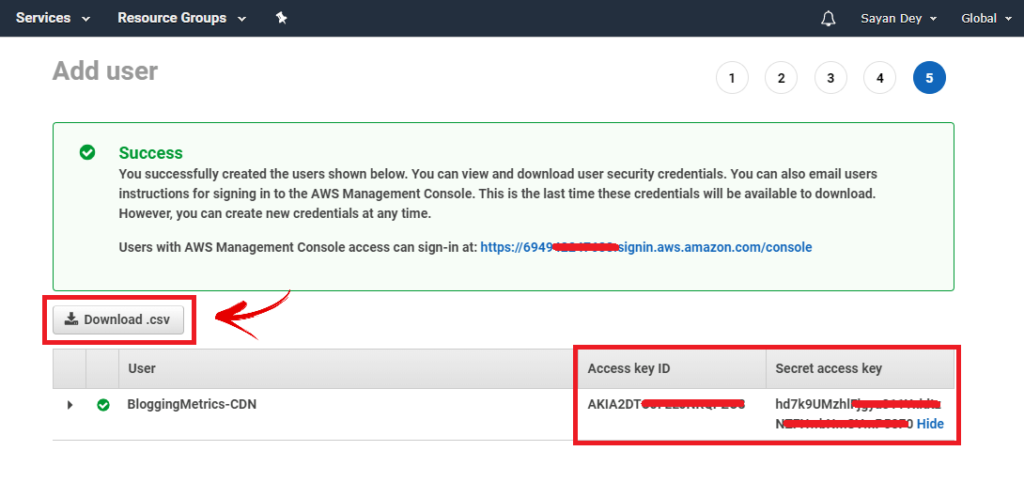
Now, verify that you have selected those two policies correctly and review all of your details. If all is well, click “Create User”.
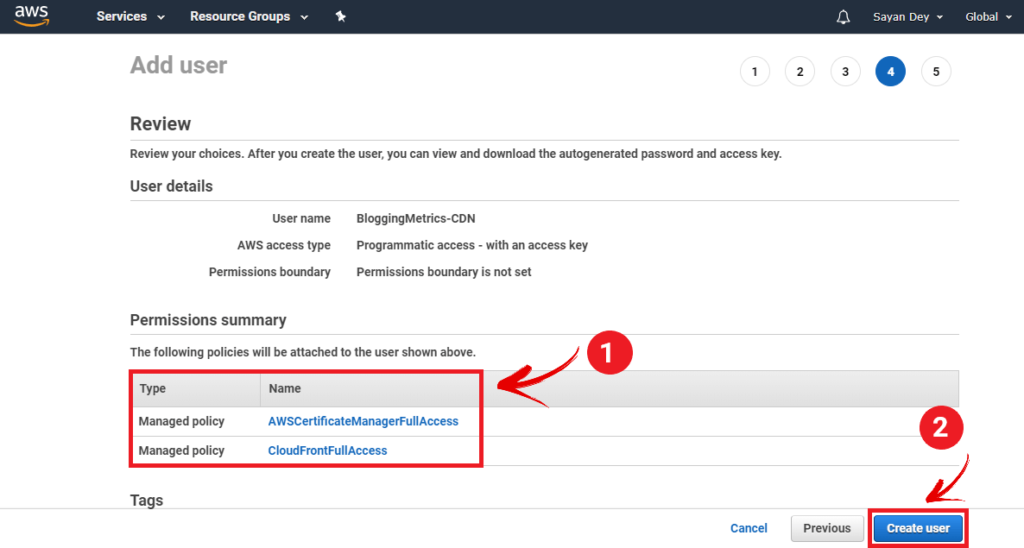
Congrats! Your IAM user account is now ready. Now download the .csv file for future use and keep this file safe. Also, you’ll see your Access Key ID & Secret Access Key on the screen.
Step 2: Connect WordPress With CloudFront
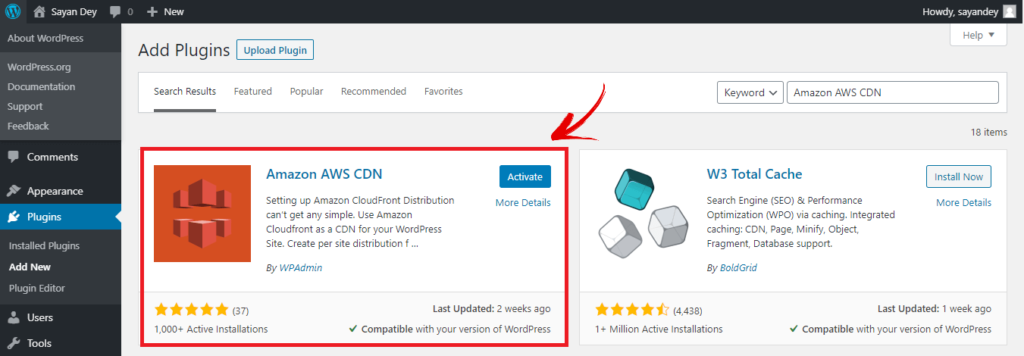
Now you have to connect your WordPress account with your Amazon CloudFront via IAM user credential. To connect your WordPress account with CloudFront go to your WordPress dashboard hover over the plugin and click on add new.
Now search “Amazon AWS CDN“ you will see this plugin and click on the install now button after installing click on activate.
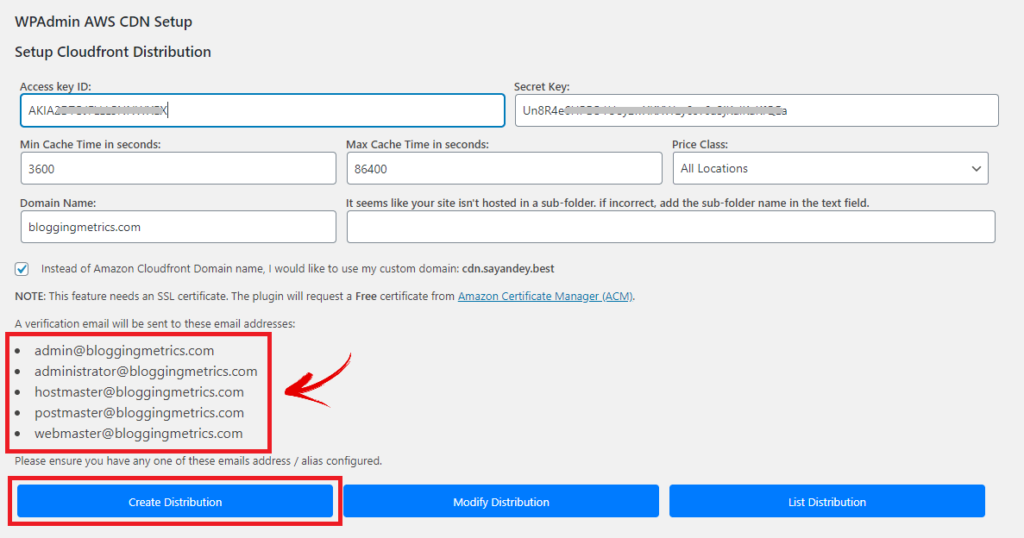
After activating this plugin go the WPAdmin AWS CDN Setup page. Now input your Access Key and Secret Key. Min Cache Time in seconds & Max Cache Time in seconds leave as default.
In price class set “All location” for best performance after that put your domain name. And the sub-folder leave as empty.
Next, if you want to use CNAME like cdn.bloggingmetrics.com make sure you check the box which is “Instead of Amazon Cloudfront Domain name, I would like to use my custom domain: cdn.bloggingmetrics.com” or if you don’t use CNAME uncheck this option. Then click on Create distribution.
But remember if you want to use subdomain you need to have one of these emails. Here is the Example:
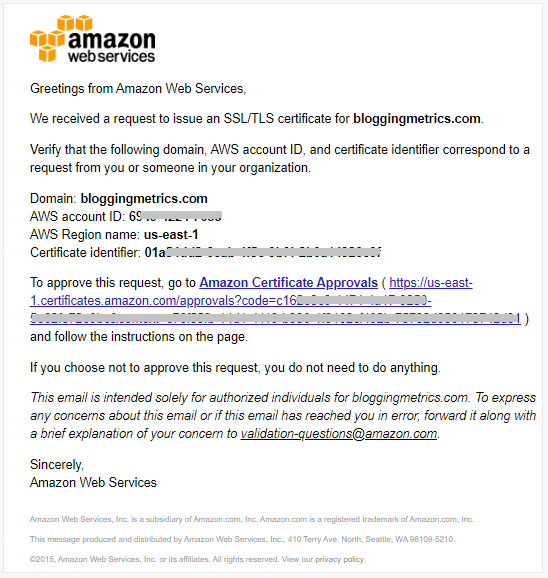
If you check the subdomain option you will receive an email from Amazon Web Service. Open your mailbox and click on the link to approve the SSL certificate which is issued by amazon for your domain.
Step 3: Verify CloudFront CDN Has Been Created
To verify that your CDN deployed correctly. open your AWS console, click on service then search CloudFront. Now open CloudFront. You will see all information related to your CDN and make sure to verify that your CDN deployed correctly.
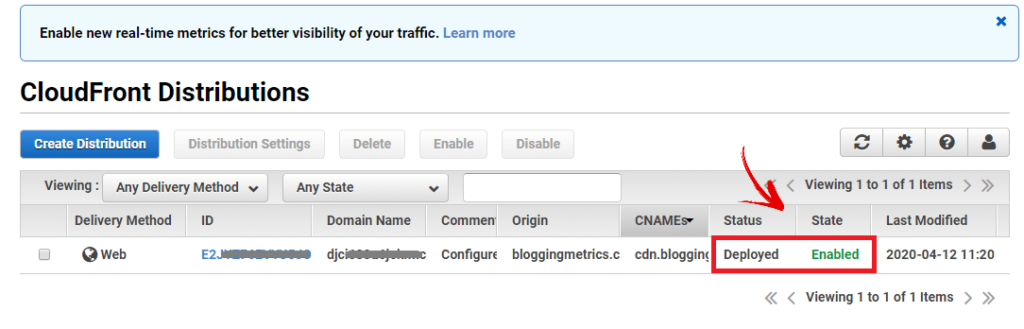
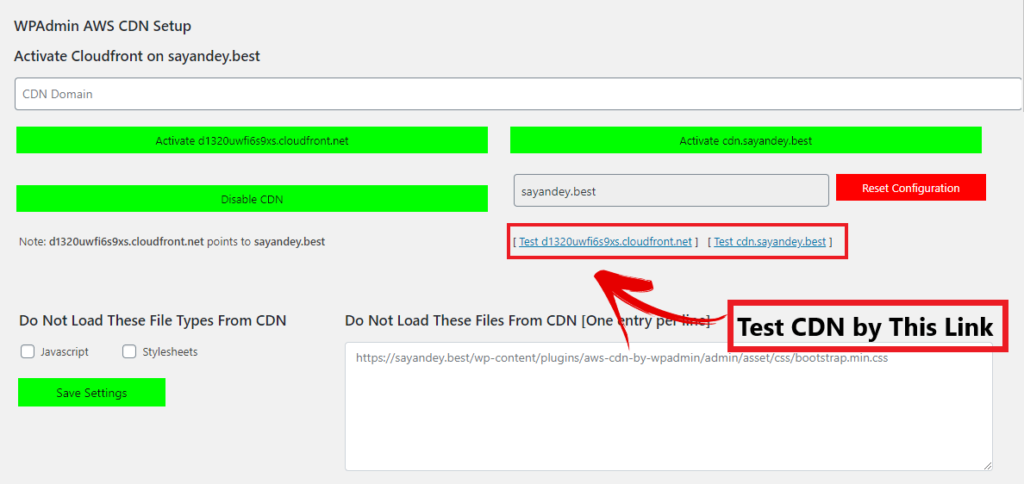
Then return to your WordPress WPAmin AWS setup page and refresh the page. Now you can see that your Cloudfront CDN is running. Click the CDN link to verify that your CDN is working.
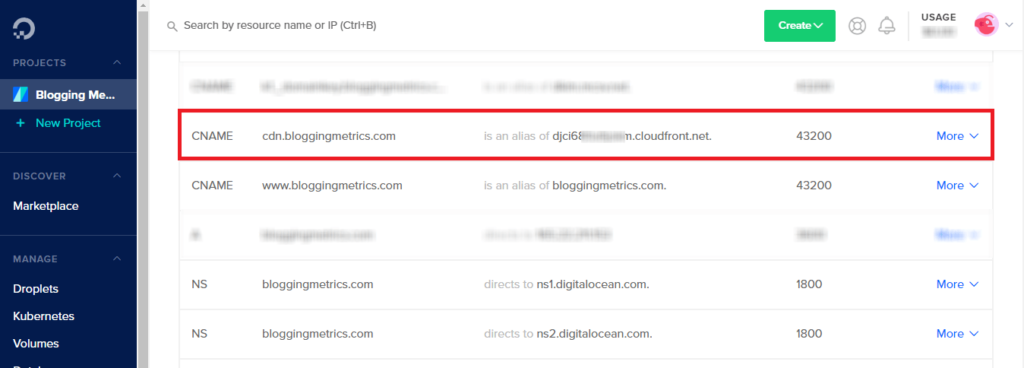
Step 4: Add a CNAME Record in Your DNS
Now open your DNS provider, and create a CNAME record and point to your AWS CloudFront domain. In my case, I’m using DigitalOcean so I create a CNAME that is cdn (cdn.bloggingmetrics.com) and points to CloudFront domain that is d1320uwfixyz.cloudfront.net
Step 5: Add a Plugin to Enable CloudFront CDN
Now you have to download a plugin and properly enable CloudFront CDN. There are two plugins in which you can select any one of them.
Plugin Name:
- BunnyCDN (by BunnyCDN)
- CDN Enabler (by KeyCDN)
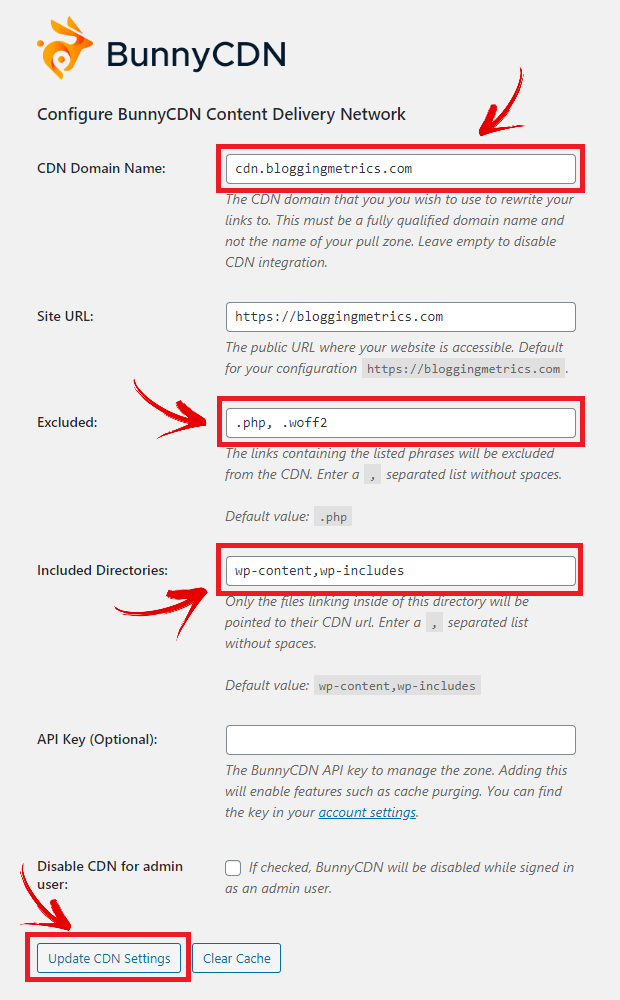
Here I’m using the BunnyCDN plugin to configure CloudFront. So, install and activate the BunnyCDN.
After activating Bunny CDN go to plugin settings and put your CDN name. In my case, I’m using CNAME so I put cdn.bloggingmetrics.com. If you don’t use CNAME then put the CloudFront domain (d1320uwfixyz.cloudfront.net)
In the Site URL field put your site URL by default it automatically detects your site URL. In the Excluded field by default, it excludes .php file, now you have to add one pore extension that is ‘.woff2’ separate by comma (,). Leave everything default and click on ‘Update CDN Setting’
Step 6: Clear Cache File of Your WordPress Website
Now, you’ve completed all the steps to set up Amazon CloudFront With a WordPress Website. Now open your WordPress dashboard. If you are using any cache plugin then clear your all cache files and open your website.
Set Up Amazon CloudFront With a WordPress [FAQs]
Now I share some common questions with answers (FAQs) which peoples generally ask or search on Google. You can check it out from here…
How do I set up Amazon CloudFront With WordPress?
1. Create an IAM User in Your AWS Console
2. Connect WordPress With CloudFront Through Amazon AWS CDN Plugin
3. Verify CloudFront CDN Has Been Created
4. Add a CNAME Record in Your DNS
5. Add a Plugin to Enable CloudFront CDN
6. Deactivate the Plugin Which is Not Required
What is Cloudfront used for?
Amazon CloudFront is a content delivery network that is powered by Amazon Web Service, which is used for speeds up the distribution of your static and dynamic web files such as .html, .css, .js, and image files, to your users.
3. Is CloudFront Free?
CloudFront, not a free service. If you use CloudFront you have to pay a monthly basis (Pay As You GO). But you can create an Amazon AWS trial account to get CloudFront free for 1 year. But a trial account offers 50 GB Data Transfer Out and 2,000,000 HTTP and HTTPS requests each month for one year. You can check CloudFront price from here.
4. Does CDN really help to speed up the website?
A CDN really help you to speed up your website. CDN (Content Delivery Network) is a geographically distributed network so the users can get requested items very easily from the closest edge server. So the Website will load faster if the distance is short.
Conclusion
In this article, we learned how to set up the Amazon Cloudfront with a WordPress website. I hope you enjoyed this article. If you liked this article, please share it with your friends and help set up the Amazon Cloudfront.
If you have any doubts about this topic you can contact me or put comments on this post, I will definitely reply to your comment.
Also, you can follow us by subscribing to our newsletter or join us to get 100+ FREE! SEO tools. Keep support Blogging Metrics See you in the next article, Until the next article, be happy and safe.
Hey! Sayan,
Thank you for this awesome post. Finally, I found a best solution to set up Amazon CloudFront. Love your blog design.
Thanks, buddy. BloggingMetrics always here to help you.
App. Na. Kasa. Bloging. Kasa. Siki
I Learn blogging from YouTube, follow other popular blogs, from blogging community, read quality articles, etc.
Amazon CloudFront is a content delivery network that is powered by Amazon Web Service, which is used for speeds up the distribution of your static and dynamic web files such as .html, .css, .js, and image files, to your users. agreed to the content provide here for us really helpful information stay with us with new ideas.
The post is informative, but some steps are missing because the plugin setting has changed. Would you please update the post?
I will update it as soon as possible.
Hi,
Nice and working! Can you please share your website optimization experience.